
As most broadband routers don’t actually give you a lot of information about your network traffic I thought I would try and see what I could do with my Raspberry
This guide takes some inspiration from Ronem Baram’s solution. The main difference here is that we are using
Requirements:
Rasbian (Stretch)
Ntopng
Raspberry Pi 3B+ (Lower specs work but
A working
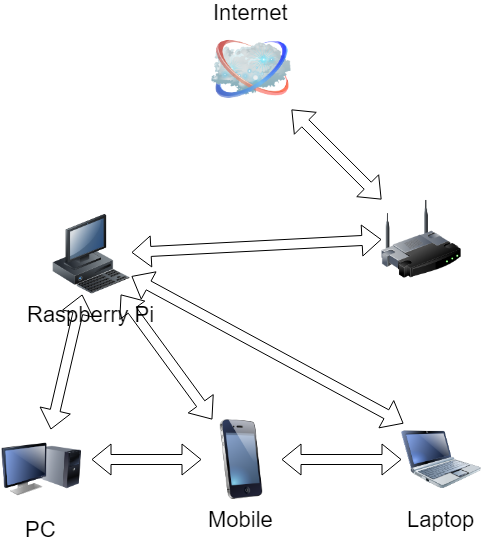
Essential what we are going to do is use dnsmasq to set the default gateway on client devices so that all traffic is routed via the pi. The pi then forwards on the traffic to you broadband router. This works for both wired and wifi clients. Bear in mind that if you have superfast broadband ie over 150Mbs this is going to create a bottleneck and slow down your connection to the internet. If that were the case I would suggest a different SoC board with true GbE rather than the Pi. Local traffic will not be affected (or monitored) as it is on the same subnet and will not route via the Pi
Installing Ntop:
sudo su
wget http://packages.ntop.org/apt/ntop.key
apt-key add ntop.keyRaspbian Stretch (9.x) [Active]echo "deb http://apt.ntop.org/stretch_pi armhf/" > /etc/apt/sources.list.d/ntop.list
echo "deb http://apt.ntop.org/stretch_pi all/" >> /etc/apt/sources.list.d/ntop.list
apt-get update
apt-get install ntopng nprobe
Installing dnsmasq:
sudo apt-get install dnsmasq
Configure
 # Remote DNS server
 server=8.8.8.8
 dhcp-range=192.168.0.50,192.168.0.99,12h
 #subnet mask
 dhcp-option=1,255.255.255.0
 #gateway
 dhcp-option=3,192.168.0.2
 #dns
 dhcp-option=6,192.168.0.2
 log-dhcp
 dhcp-authoritative
Enable routing/IP forwarding :
sysctl -w net.ipv4.ip_forward=1
This will be temporary so edit /etc/sysctl.conf and add or un-comment the line below to make the change permanent.
net.ipv4.ip_forward = 1
Add an appropriate rule to your IP tables script and restart IP tables.
-A POSTROUTING -o eth0 -j MASQUERADE
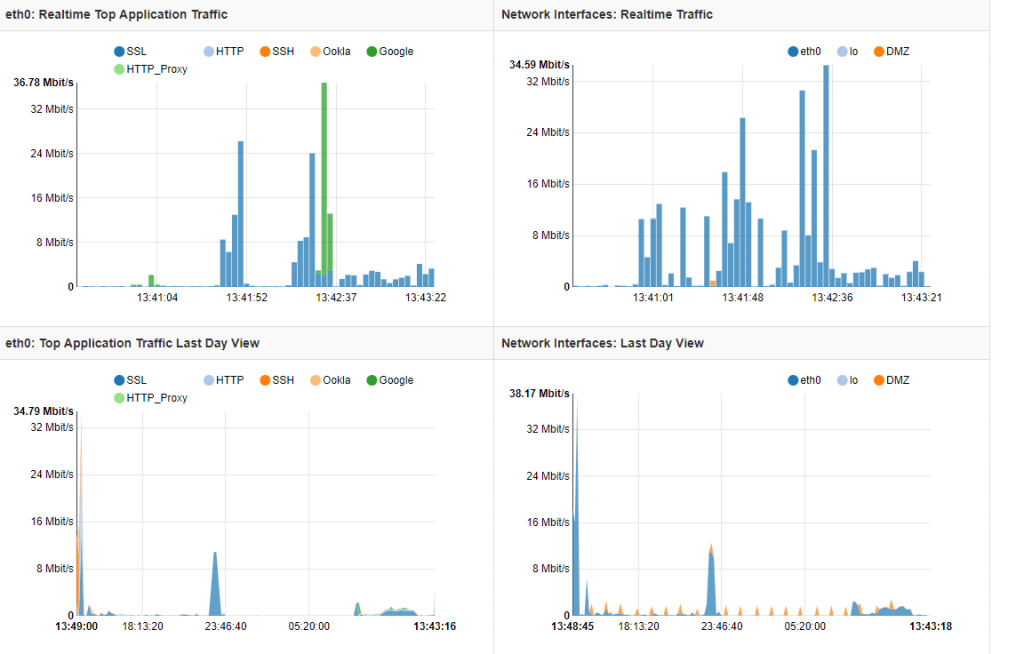
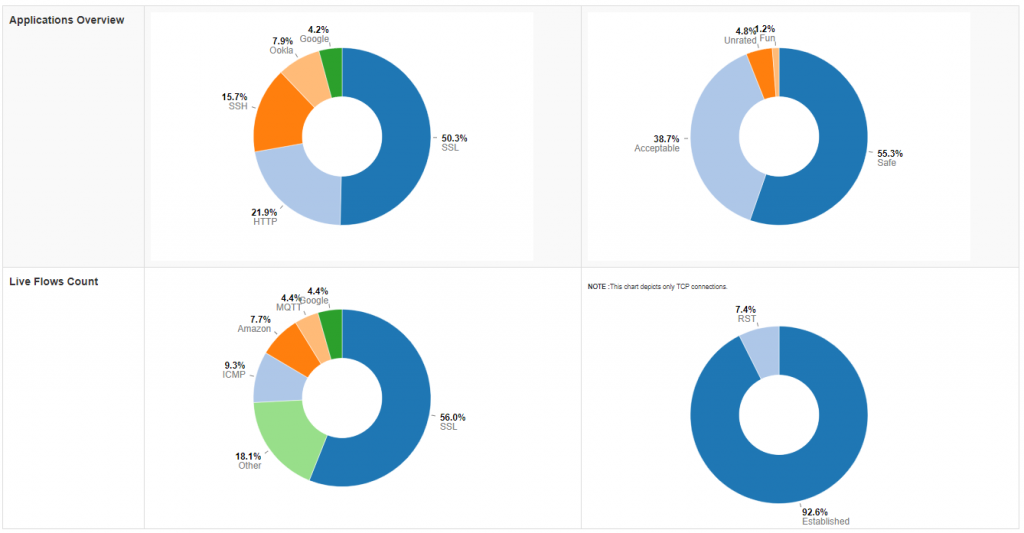
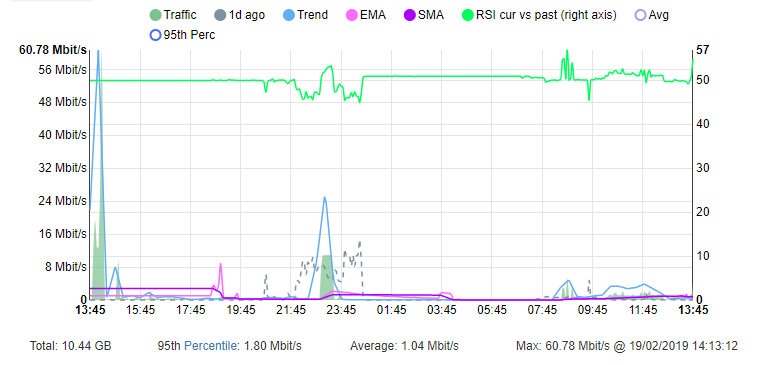
You should now be able view your netowrk traffic via:
http://<your Pi IP>:3000/
Ntopng really gives you loads of info. I have only really just scratched the surface of using it. Enjoy
This is of interest to me, thanks for exploring and sharing!!! So for NTopNG licensing, is this the “ARM Pro Embedded” license for $50? Also, if I have all my devices connected to an sFlow-supported LAN switch, if I use the switch to send sFlow data to NTopNG, wouldn’t that eliminate the need to “route” traffic thru the Raspberry Pi?
So the basic product is free but with some features limited. In answer to your second question, I believe so yes although I am not ntopng expert.
Hi thanks for sharing this solution. I’ve purchased a Pi 3B+ and followed your guide and managed to get NTOPNG working. I did have to disable DHCP on my router as well as set a static IP address on the Pi too. Once working I have noticed though that NTOPNG reports roughly twice the actual bandwidth traffic on my home network. For example I have an 80Mb/s bandwidth service that speedtet.net figures confirm. However with my NTOPNG Pi setup when carrying out a speed test NTOPNG reports around 160mb/s total bandwidth i.e. around 80mb/s up and 80mb/s down. Upon further inspection NTOPNG reports 80mbs is to my desktop carrying out the speedtest and another 80mbs by the Raspberry PI running NTOPNG. It appears traffic is been incorrectly reported twice. Does your setup exhibit this behaviour or is there something wrong with my configuration? Are you able to suggest any settings I can change to correct this? I’ve spent a full day trying without success. Any help you can offer would be appreciated. Thanks in advance!
Hi thank you for the sharing this interesting solution. I have followed your instructions and setup NTOPNG on my Raspberry Pi 3 B+. Only additional steps I took where to disable DHCP on my Pi and also ensure that I manually set the Pi’s IP address. The only problem I have experienced is that NTOPNG reports double my home network bandwidth utilisation. I have a 80mb/s broadband service evidenced by speedtest.net. However using the Pi, NTOPNG reports this as 160mb/s, (80mb/s downstream and 80mb/s upstream). Upon further investigation NTOPNG attributes 80mb/s bandwidth to my PC running the speedtest and also 80mb/s to the Pi. Is this how your own configuration reports bandwidth or is there something wrong with my configuration? Any help you are able to provide is appreciated. Thanks in advance!
Hi, Yes this is expected behaviour. Ntopng is counting the total traffic which is both in and out as it is acting as a masqurading router